Using Visual Studio to debug a Unity game on Android device
December 08, 2020
The first time I tried writing a mobile game using Unity I found it took me way too long to get things set up where I could actually debug code running on the Android device. I recently set up Unity on a new laptop and things went fairly smoothly so I thought I’d document the process to try to help others out.
1. Install VS Community Edition
It’s easiest to have Visual Studio installed before before installing your Unity version so that when Unity installs it installs the VS dev tools. If you’ve already installed a Unity version though you can always go back and add the VS dev tools module after the fact.
You can find the Visual Studio Community Edition installer on this website.
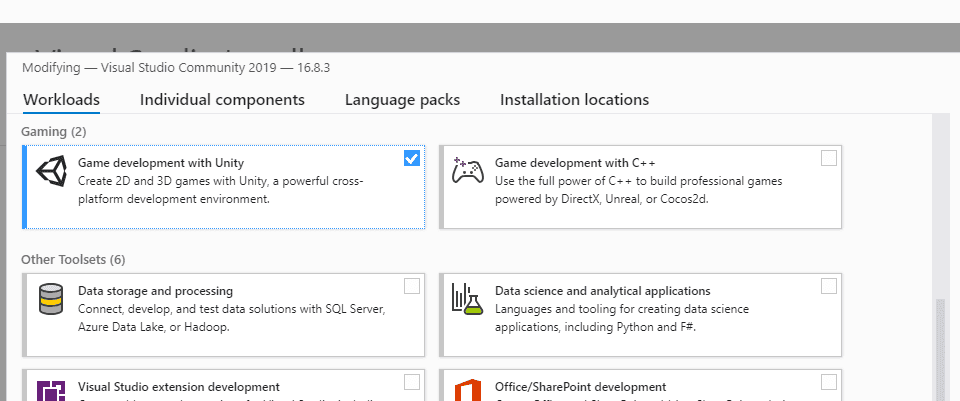
When installing Visual Studio be sure to select the “Game development with Unity” workload:
2. Install Unity
These days Unity Hub is the best way to install and manage different Unity. You can find it here.
After you get Unity Hub installed, start it up, configure your license and then click on the “Installs” nav item on the left:
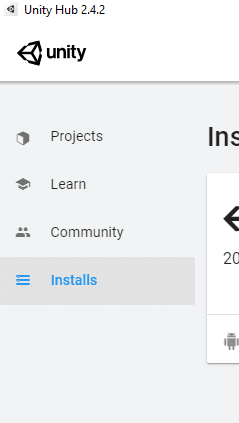
Select “Add” to add a new Unity version to your compute and select a specific version (an LTS version is always a good choice).
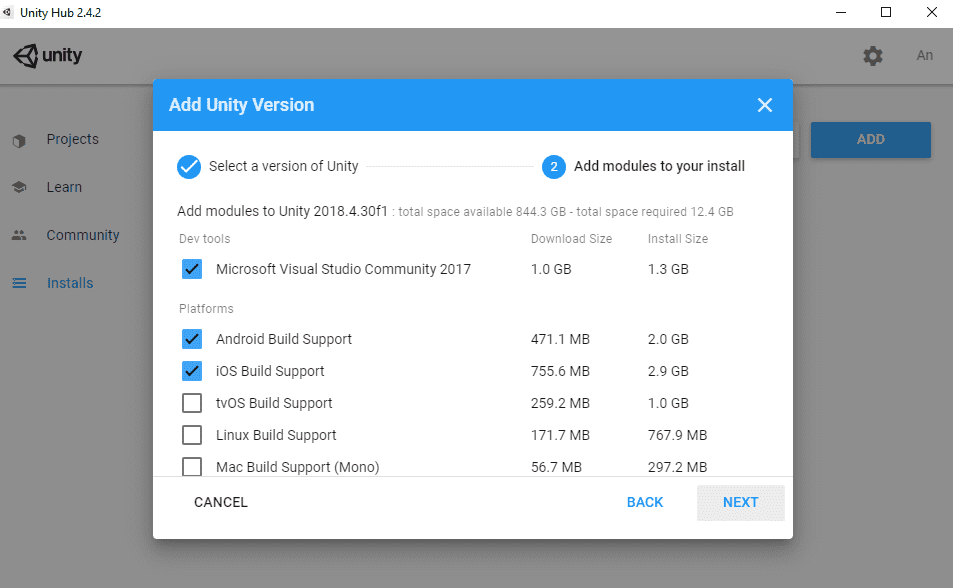
Now you’ll be presented with list of modules to choose to install. Make sure you check the “Microsoft Visual Studio Community” dev tools module (although it says 2017 it worked fine for my VS Community 2019 install) as well as “Android Build Support” (and anything else you need):
3. Configure Unity to open Visual Studio
The next step is done from within Unity so go ahead and open your project in Unity (or create a new one). Right clicking in the “Project” pane at the bottom shows an “Open C# Project” option that should open your project in Visual Studio but when I tried it, it opened an explorer window instead.
It looks like what’s going on is Unity isn’t generating the .csproj and .sln files. I’m not sure why that is but it can be fixed by going to the “Edit” menu and selecting “Preferences …“. In the dialog select “External tools” then at the top is an option for “External Script Editor”. Changing that from “Open by file extension” to “Visual Studio” made things work for me:
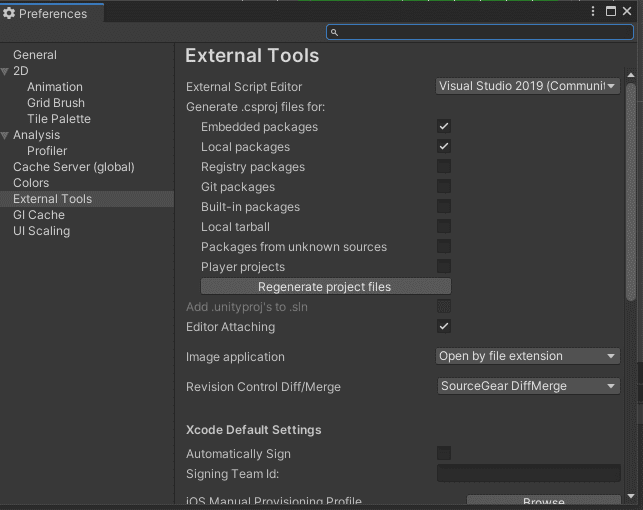
Once I selected that, I exited the preferences and when I tried “Open C# Project” again it came up in Visual Studio!
At this point you should be able to debug your game by:
- Opening Visual Studio from the Unity project (using Open C# Project)
- Selecting the “Attach to Unity” debug button at the top of the window:

- Setting some breakpoints in the code
- Playing your scene from within Unity (using the play button at the top)
Visual Studio is now debugging your game running in Unity!!
In my case I was trying to debug some Android specific stuff so there were a few more things I had to do to get debugging code running on the Android to work.
4. Hook up an Android device, enable debugging and build an APK
Before you can use your Android device for development you need to follow the instructions here.
Next hook up the device to your computer via USB. To make sure Unity can see it, go to the “File” menu then “Build settings…“. From there select the “Android” platform in the bottom left and then check the “Run device” dropdown. You should be able to find your Android device. If you can’t you can try clicking the “Refresh” button to see if that makes it show up.
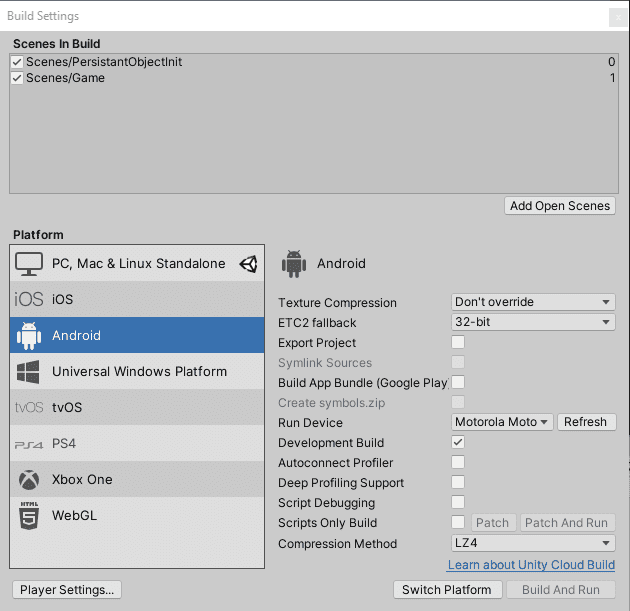
Once you have the device selected the next thing to do is build the APK but as you can see in the screenshot above the “Build And Run” button was grayed out for me. After unsuccessfully changing EVERY setting possible to see if it would enable the button, I took to the web and found I wasn’t the only one having that problem.
The solution that worked for me was to keep the build settings dialog open and “Android” selected as the build platform, then select the “File” menu again and pick “Build and Run”. You’ll be asked what to name the APK (I used “test.apk”) and then an APK will be built and sent to your device. As to why you can do it from the menu but not the dialog, I have no idea.
After doing this once the “Build and Run” button in the build settings dialog was working properly for me. In the future you can just return there to build and deploy changes to your device.
5. Debugging from Visual Studio
We’re almost there! Now that you have your code running on your device let’s go back to the build settings dialog and make sure the right options are selected. I set the following:
- Development build
- Script debugging
- Wait for Managed Debugger
That last option will show a dialog at the start of your game that will pause execution and let you attach a debugger so you can debug your startup code. It’s handy when you need it but fine to leave out if you don’t.
Build and deploy to your phone with those settings then go back in to Visual Studio. Now instead of selecting “Attach to Unity” we need to choose the “Attach Unity Debugger” from the “Debug” menu. After selecting this you should see a dialog couple options options. The one with the IP address in the name is the instance running on your phone so attach to that, set some breakpoints and debug away!
Conclusion
The steps above aren’t too complicated but I found there are a lot of opportunities to screw something up, especially if you’re new to Unity like I was, so hopefully a guide made things easier for you.
My ultimate goal is to get an Android emulator running on my computer as well and debug using that (to cut out the need to hook up a phone each time) but after a couple attempts, using the Android Studio debugger and the VS Android debugger, I’ve yet to actually get anything working. I might look into Nox. If I get something working I’ll write another post letting you know how I got it working.